
Alpine boot soles now come in three different iterations. Pictured here, front to back, are Gripwalk, an Alpine sole with replaceable sole pads, and a monoblock racing sole. Which one is right for you?
Last week, I illuminated to what degree the recreational skier ought to fret over waxing, base structuring and edge beveling. This week, I get into the details regarding different boot soles, binding standheight and ramp angle, shims – in all their varied manifestations – and pole length.
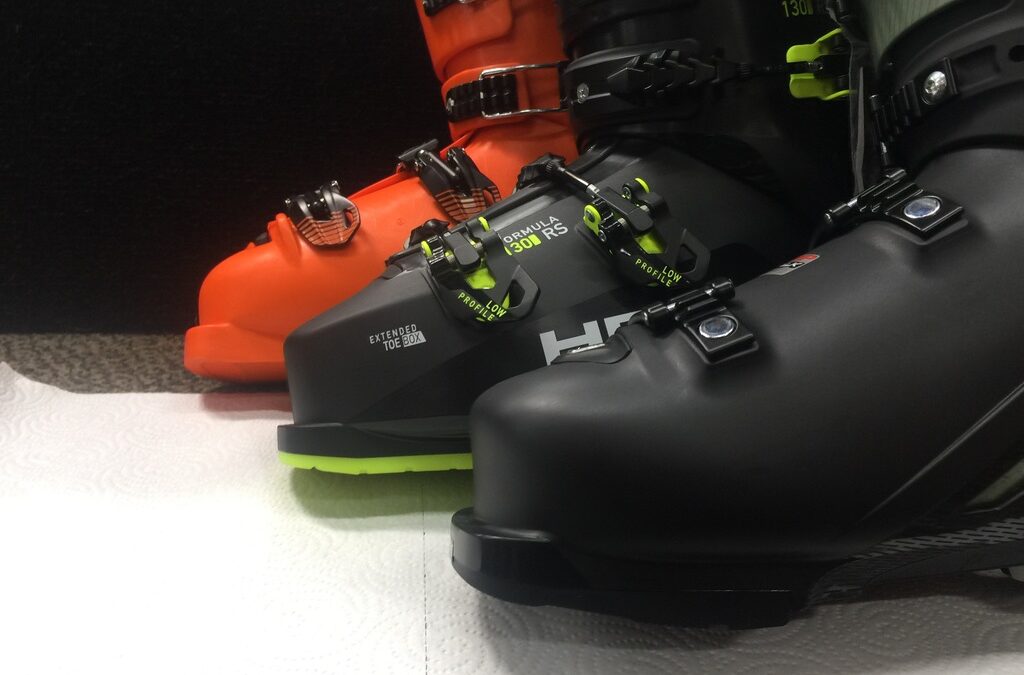
Boot Soles
Unless you’re part of the growing population of backcountry skiers, you probably suspect all boots soles are the same. At one time, this was a safe presumption, but that time has passed. Last year, a new Alpine boot sole standard went into effect, sanctioning a walk-friendly sole that was already widely in use. The new standard, which goes by the commercial moniker Gripwalk®, adds a grippy rocker under the ball of the foot so stride feels more natural, and the added tread makes navigating slippery parking lots a less terrifying affair.
But Gripwalk soles are not an unqualified blessing. Elevating the skier’s toes in this fashion is of dubious technical value, and the squishy element under the forefoot weakens the energy exchange between skier, ski and snow. Gripwalk soles also obsolete any binding without a toe height adjustment, hastening the retirement of thousands of bindings.
As you’ve come to suspect, Dear Readers, the race community has an entirely different approach to boot soles. Their single-piece (aka, monocoque) lower shells have patently non-standard soles that are extra-thick so they can be shaved down to the precise angle dictated by the racer’s stance and how the rest of his/her rig is set up. Their soles are so slick, they’re easier to ski in (sans skis) than walk in.
The real beauty of a race sole isn’t that it’s cantable, but that it’s part and parcel of the entire lower shell. There is no removable, treaded shim attached to the sole to provide some traction; the sole and the boot above it are one. This gives the racer an immaculate feel for what’s up underfoot, a level of precision unattainable if any part of the sole is a separate unit.
Mercifully, you don’t have to get a full-on, non-ISO race boot to get a monocoque shell. Almost all brands have a small line of citizen race boots in 130 and/or 140 flexes with monocoque shells. If that’s a little rich for your blood, many Gripwalk boots come with replacement Alpine soles for those skiers who place a higher value on ski-ability than walk-ability.
Standheight and Ramp Angle
Most skiers probably never heard of ramp angle or standheight, but in carving circles their importance is paramount. Standheight refers to how high the binding and its companion interface elevates the skier off the snow. Standheight has such a direct influence on leverage and power generation that the FIS places strict limits on it, knowing that coaches and athletes, left to their own devices, would otherwise stack the racer on a pile of elevated platforms.
Once you move a binding even a few mm’s off the ski or plate it attaches to, it’s possible to play with the height of the toe and heel separately. Some system skis (skis sold exclusively with their own bindings) supposedly have a positive ramp angle, meaning the heel is higher than the toe, while others reputedly are flat. (Ramp angle is measured in degrees, and the term “delta” is used to describe the change in height between the heel and toe.) I’ve added “reputedly” and “supposedly” because I’ve not measured every binding’s ramp angle as I’m not convinced the ramp angle on system skis matters that much to recreational skiers. Regardless of the degree of ramp angle, it is what it is by design, not by accident. If the skier doesn’t like it, a couple of shims will set things right (see Shims, below).
One cautionary note about ramp angle: it’s already built into your boots and is present to a lesser degree in your bindings. Be careful when dabbling with ramp angle alteration as you may end up with too much of a good thing. Remember that the goal is always a skier in perfect balance, not adherence to some guru’s ideology.
Shims
Optimizing your gear isn’t about making gross alterations, but subtle shifts that help your body find and maintain a centered, balanced stance. Inside a ski boot, a millimeter can make a world of difference. The same is true for what goes on under your boots; little shifts mean a lot.
A properly applied shim can retract a protruding bone, alleviate a pressure point, shut down an over-sized aperture, help retain a mobile heel or shift a skier’s stance. Shims hold the key to finding a sustainable, centered stance that liberates the skier’s ability to adapt intuitively to what’s happening underfoot.
The only downside to selective shimming is that it takes a seasoned set of eyes to determine both when and where some sort of shim is called for. Self-assessed and self-administered shimming sessions are rarely as successful as having a veteran bootfitter in charge of the operation.
Naturally, this caveat applies to all the topics raised in this Revelation. Experienced technicians and bootfitters are invaluable allies in a skier’s development. If you haven’t already done so, you should adopt one soon at your favorite specialty shop.
Pole Length
The accepted method for determining appropriate pole length is to turn the pole upside down and grip it just under the basket. When the pole is held in front of the skier with the handle touching the ground, the skier’s forearm should be level.
But you can’t please all the people all the time, so of course there are skiers who’d rather have their poles longer or shorter than the norm. The park people who populate America’s half-pipes wouldn’t dream of dropping in with a pole any higher than their waist. I have two dear friends with starkly contrasting styles, 5X U.S. PSIA Demo Team member Mike Rogan and my beloved co-author, “Guru” Dave Powers, who also use poles at least half a foot shorter than what I prefer. Rogan does so because his hips skim just above the snow when he’s carving – there’s no room for a conventional pole. Guru Dave maintains a protective stance with minimal arm movement in order to maximize his smoothness.
I mention Rogan and Powers to illustrate just how idiosyncratic pole length preference can be. Personally, I like a slightly longer than normal pole because I only use my pokers to help propel me across flats or reach downhill on steeps without over-piking at the waist. Otherwise I tuck them out of harm’s way. My choice isn’t any better or worse than Mike or Dave’s, it’s just what works for me and my taller stance.
I hope this little dissertation has provided some knowledge, comfort and/or direction to help you, my Dear Readers, get more out of your ski experience.